Navigating Configuration Options
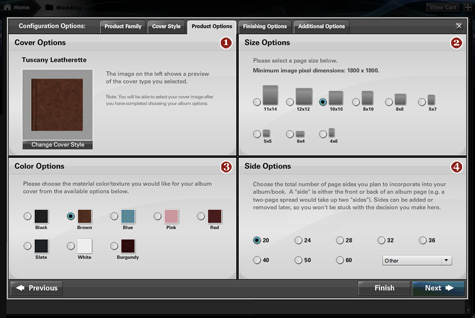
After creating your product you are directed to the Configuration Options panel. The Configuration Options panel assists you in personalizing different aspects of your final product. In the Configuration Options panel you can decide which basic product (or product family) you would like, what your product's cover will look like, the size of your product, the number of pages in your product, the type of printing paper used in your product, and much more. The Configuration Options panel features up to five different panels:

- Product Family Panel
- Cover Style Panel
- Product Options Panel
- Finishing Options Panel
- Additional Options Panel
Available panels and modules are based on the type of product you select in the Product Family panel.
You can navigate within the Configuration Options panel at any time by clicking the Previous and Next buttons at the bottom of the screen. Any changes made within the Configuration Options panel will be automatically saved.
You can proceed to the Designer screen at any time by clicking the Finish button on the bottom of the screen.
You will be able to return to the Configuration Options panel at any time to change your product features.
Pricing
The basic price for each product is provided when you first pick your product family in the Product Family panel. These prices are based on a series of default product options.
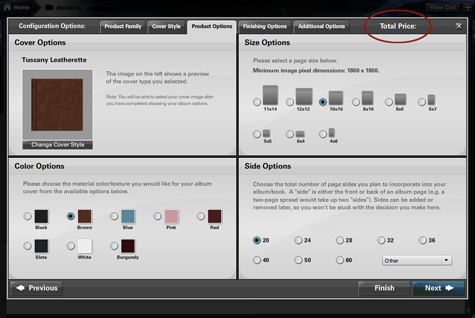
Default options are already chosen for you throughout the Configuration Options process. If you change your selection from the default option, the total price will change. As you make these changes, you can view your updated total price by looking at the upper right-hand corner labeled Total Price.
Product Family Panel
In the Product Family panel, you can select from a variety of basic products (called "product families"). Each product family has a default starting price. For more information on how this price may change in later steps visit Pricing. Under each product family is a description outlining its unique features and options.
Once you know which product family you would like, click the corresponding Select button under the description.
Cover Style Panel
In the Cover Style panel, you can select options for your product's cover. The options available are based on the product family selected in the Product Family panel. The cover style options available may include your choices for your product cover's look, color, and material.
Cover Style Panel - Mosaic
Mosaic is an album product family. If you selected the he Mosaic album in the Product Family Panel, your Cover Style panel has a different layout than other product families.
In the Mosaic album's Cover Style panel, you can customize your album cover's design options and leather options and preview the changes as you make them using the Design Preview.
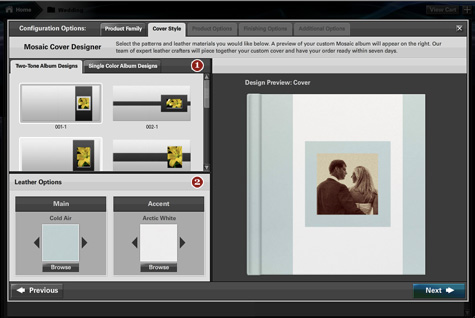
- Album Design: The Album Design module allows you to choose between various album design templates. Notice the Two-Tone Album Designs tab and the Single Color Album Designs tab which allow you to select either one or two-colored album covers. To select a design, click on the desired design template. The design is selected when you see it in the Design Preview.
- Leather Options: The Leather Options module allows you to choose between a number of leather and color options for your album cover. You can select a leather option one of two ways:
a. Click the arrows to the left and right of the color box to scroll through options.
b. Click Browse to view all options available. To select an option, click directly on the color box.
The leather option is selected when you can see your selection in the Design Preview.
Finishing Options Panel
In the Finishing Options panel, you can add final touches to the basic customization of your product. Based on the product family you selected in the Product Family panel, this may include corner options, paper options, embossing options, and gilding options.
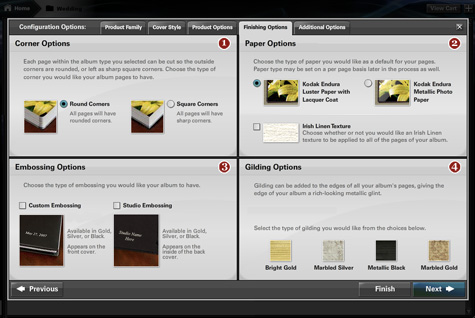
- Corner Options: The Corner Options module allows you to select how the page corners of your product will look. Based on the product family you select, your options may include square corners or round corners.
- Paper Options: The Paper Options module allows you to select the type of paper you would like as a default for your pages. The paper options may also be set on a per page basis later in the process. Depending on the product family you select, there are different photo papers and finishes to choose from:
a. Kodak Endura Luster Paper with Lacquer Coat: A matte, semi-glossy finish. Lacquer coat adds durability to the print surface and prevents it from adhering to glass frames.
b. Kodak Endura Metallic Photo Paper: A glossy finish with a slight metallic sheen.
c. Standard Finish: ??? STANDARD MATTE OR GLOSSY?
d. Art Finish: A matte finish with a construction paper texture.
e. Linen Matte Finish: A matte finish with a grid, fabric texture.
f. Standard Matte Finish: A standard matte finish - much like a standard matte photograph.
g. Pearl Finish: A semi-glossy finish with a slight ivory sheen.
h. Linen Gloss Finish: A glossy finish with a grid, fabric texture.
i. Standard Glossy Finish: A standard semi-glossy finish - much like a standard glossy photograph.
j. Lacquer Spray: The lacquer coat adds durability to the print surface and prevents it from adhering to glass frames.
You may also have the option to apply an Irish Linen Texture to all your product's pages. Selecting this option will create a rag linen texture on each page.
- Embossing Options: The Embossing Options module gives details on your available embossing options. Based on the product family you selected in the Product Family panel, you may have the option of embossing a custom message and/or embossing the name of a studio or business. If interested, check the box of the embossing option you would like. You will write the message later in the process.
- Gilding Options: The Gilding Options module allows you to add gild to the edge of each page, giving the edge of the product a metallic glint. Check the Add Gilded Edging box and select the gilding color you would like to add gilding to your product.
When you change your options from the default, the total product price may change. You can see the total price at any time by looking at Total Price in the upper right-hand corner. For more information on this visit Pricing.
Additional Options Panel
Under the Additional Options panel, you can select if you would like your product to come in a high-quality presentation box. Available box options are based on the product family you selected in the Product Family panel.
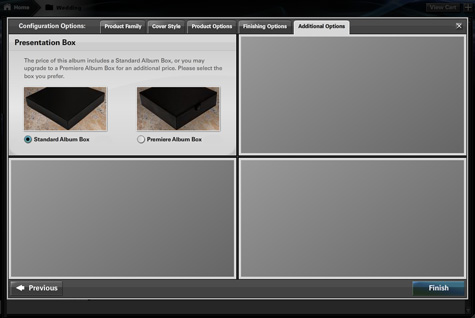
Once you are done selecting all of your configuration options, select the Finish button on the bottom right-hand corner to proceed to the Designer screen.
When you change your options from the default, the total product price may change. You can see the total price at any time by looking at Total Price in the upper right-hand corner. For more information on this visit Pricing.