|
|
THE DESIGNER SCREEN
Navigating The Designer Screen
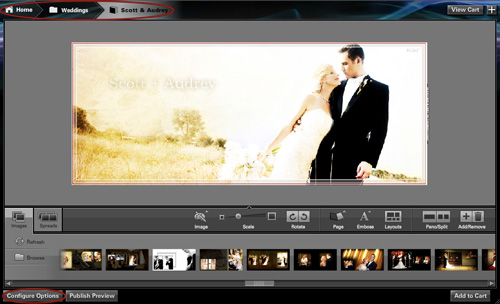
Cascade's Designer screen provides you with a variety of tools to customize each page of your product. The Designer screen is where you can take every customization feature you have selected thus far and preview how each of these features look together in one complete product. Here you can view all your images, add or remove images, edit images, edit page spreads, add page templates, preview the layout of each page, and much more. The Designer screen can be divided into four sections:
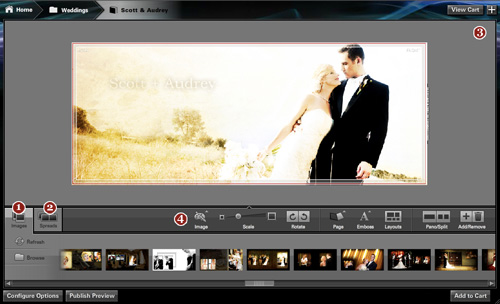
- Images Thumbnail Browser
- Spreads Thumbnail Browser
- Preview Area
- Control Panel
|
Definition:
Page Spread/ Spread: Two facing pages of an album or press book.
|
Images Thumbnail Browser
The Images Thumbnail Browser is where you can view or "browse" through small, thumbnail-sized versions of all the images available for you to place into your final product. These images are all of the images you located when you first added a new product. The Images Thumbnail Browser is also where you can add more images from different locations on your computer.
To access the Image Thumbnail Browser, select the Images tab on the lower left-hand side of the screen. You can use the scroll arrows on the bottom left and right ends of the browser to scroll through your images.
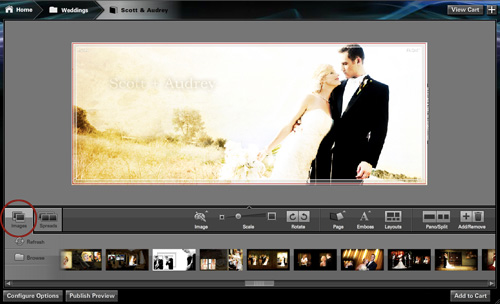
Browse Icon: If you would like to add more images from a different folder on your computer, you may locate these images by selecting the icon labeled Browse.
Refresh Icon: If you choose to edit or move images from a location on your computer to a folder that has already been located by Cascade, select the icon labeled Refresh and these images will appear in the Image Thumbnail Browser.
Spreads Thumbnail Browser
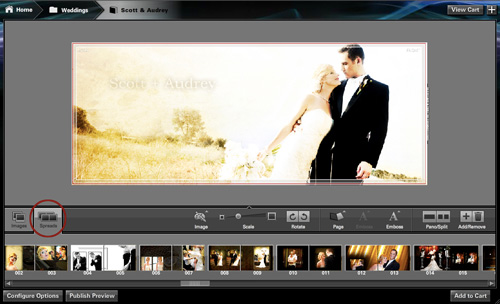
The Spreads Thumbnail Browser is where you can view or "browse" through small, thumbnail-sized versions of all spreads that will be in your final product. A spread or a page spread is a two facing pages of an album or press book. The Spreads Thumbnail Browser displays the number of spreads your current product contains. The number of spreads was selected in the Product Options panel of Configuration Options. You can add or remove spreads in the Spreads Thumbnail Browser using the Add/Remove Tool in the Control Panel.
To access the Spreads Thumbnail Browser, select the Spreads tab on the lower left-hand side of the screen. You can use the scroll arrows on the bottom left and right ends of the browser to scroll through your Spreads.
To learn how to preview a spread, visit the Preview Area.
Preview Area
The Preview Area is where you can preview how the images from your Images Thumbnail Browser look when placed into the page spreads from the Spreads Thumbnail Browser. The Preview Area is also where you can preview what each spread will look like in the final product.
You can preview a spread one of two ways:
a. Select the Spreads tab and click directly on the page spread you would like to preview.
b. Click on the arrows to the left and right of the Preview Area to scroll through page spreads in order.
To learn how to place images into a page spread, visit Inserting Images Into Spreads.
Inserting Images Into Spreads
To preview how each page of your final product will look, you need to insert images into each page spread:
- Select a page spread using one of two ways listed under Preview Area.
- Select the Images tab.
- Place your cursor over the image you would like to add.
- Click and drag your image into the Preview Area in an area with the icon seen on the right (called a "drop zone").
- Release your cursor to place the image.
|

Definition:
Drop Zone: A designated space where images can be placed. In Cascade, areas with the icon seen above are drop zones. Images can only be placed into drop zones.
|
Moving Images Within Spreads
Sometimes an image you place into a drop zone is bigger than the drop zone itself. When you place the image into a drop zone, the image does not adjust to the size of the drop zone. While you may want to scale to image using the Scale tool, you also may want to move the image around within the drop zone to a position of your liking.
To move an image within a spread:
- Insert an Image into a spread. If you are unsure how to do this, visit Inserting Image Into Spreads.
- In the Preview Area, place and hold your cursor on the image you would like to move.
- If the image is bigger than the drop zone, you can move your cursor to move the image within the drop zone.
- Release your cursor to place the image.
Image Cover Wraps
Based on the product family selected in the Product Family panel and the cover options selected in the Cover Style panel of Configuration Options, your Preview Area may have an Edit Cover button when the Designer screen first opens:
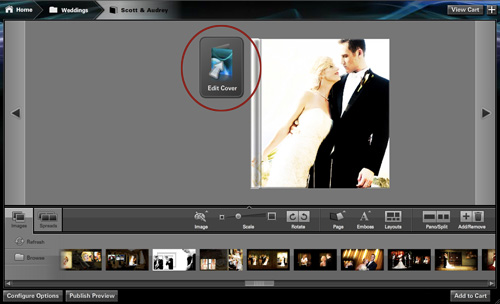
If this is the case, it means that you selected to place an image around the cover of your product. This is called a "cover wrap."
To place a cover wrap on your product cover:
- Select the Edit Cover button in the Preview Area
- Select the Images tab.
- Place your cursor over the image you would like to add.
- Click and drag your image into the page spread in the Preview Area.
- Release your cursor to place the image.
- Select the Edit Album button in the Preview Area to complete the cover wrap edit.
Control Panel
The Control Panel is where you have the most control in editing how an image looks within a spread. The Control panel offers various ways to edit images, change spread layouts, adjust page options, adjust spread options, and more. The Control Panel has eight tools to work with:

- Image Tool
- Scale Tool
- Rotate Tool
- Page Tool
- Emboss Tool
- Layouts Tool
- Pano/Split Tool
- Add/Remove Tool
Image Tool
Once you insert an image into a page spread, the Image tool allows you to edit an image's tone, opacity, background color, stroke color, and stroke width.
- Click the image you want to adjust in the Preview Area.
- Click the Image icon to open the Image Options panel. To adjust the image's tone, select between natural (which leaves the image color as is), black & white, or sepia. To adjust the image's opacity or stroke width, use the scroll bar or enter the desired value in the section's text box. To adjust the background color or stroke color, click the color box in the appropriate section and select between the provided color options.
Scale Tool
Once you insert an image into a page spread, the Scale tool allows you to zoom in and out of an image.
- Click the image you want to scale in the Preview Area.
- Click and drag the circle in the Scale tool to adjust the image's scale.
The image will only zoom in or out within the standards of print quality. Therefore, if the scale tool won't zoom in or out past a certain point, that is because zooming in or out anymore would create an image that is no longer print quality.
Rotate Tool
Once you insert an image into a page spread, the Rotate tool allows you to rotate an image clockwise or counterclockwise in 90° increments within a page.
- Click the image you want to rotate in the Preview Area.
- Click either of the Rotate arrow icons to rotate an image clockwise or counterclockwise in 90° increments.
If an image is too small to be rotated 90°, a prompt will appear asking if it can rotate the image 180° instead. Select accordingly.
Page Tool
Once you insert an image into a page spread, the Page tool allows you to edit each page's paper and texture options. In the Finishing Options panel in Configuration Options you are able to select the type of paper you would like as a default for all of your pages. The Page tool, though, lets you select the type of paper you would like on a per page basis.
- Click the page you want to apply a type of paper to in the Preview Area.
- Click the Page icon to open the Page Options panel.
- Select the desired type of paper and close the Page Options panel to save.
When you make a page option choice, you will not see any physical changes to the look of the image or page in the Preview Area
Emboss Tool
The Emboss tool allows you to create a personal, embossed message in a designated section of your product. Embossing is charged per line. The total price will auto update as you add a message to each line. This option is only available if it was available based the product family selected in the Product Family panel of Configuration Options AND the embossing option was selected in the Finishing Options panel in Configuration options. Visit Finishing Options panel for more information on embossing options.
- Select the page that will display your embossed message. The location of the message is predetermined based on whether you selected Custom Embossing or Studio Embossing in the Configuration Options panel:
Custom Embossing: Select the Spreads tab and click the cover thumbnail (the first page in the Spreads Browser).
Studio Embossing: Select the Spreads tab and click the last spread thumbnail (the second to last page in the Spreads Browser).
- The Emboss tool is now be available to select. Click on the Emboss tool icon to open the Embossing Options panel.
- Select the color you would like the embossed text to be.
- Select the text boxes to add text. Each text box is limited to 25 characters.
- You can adjust the font size of each line of text by selecting the desired size to the right of the text box.
- When you are done entering text, click a different spread or close the Embossing Options panel to save.
Layout Tool
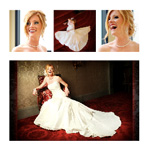
The Layout tool allows you to select how each page will look using layout templates. Layout templates are basic templates with drop zones throughout the page where you can place different images. Please refer to the images to the right to see a layout template before and after images are inserted.
- In the Spreads tab, select a page spread to preview in the Preview Area.
- In the Preview Area, select either a single page or an entire page spread using the Pano/Split tool.
- Click the Layout tool icon to open the Layouts panel.
- Layout templates are grouped by the number of images on each page or spread. Scroll to the desired number to see the layout options for that number. Layout template options will appear to the right of your selection.
For example: You would like a certain page to have four images on it. Select the desired page spread in the Spreads tab. Then, in the Preview Area, click the exact page you would like the images to appear on. Next, select the Layout tool and scroll to "Four."
- If multiple templates are available, use the scroll bar to scroll through the layout template options.
- Put your cursor over a layout template and click to apply the template to the page or spread.
If you know how many vertical and horizontal images you would like to place on a single page or page spread, you can do so by using the Search All button in the Layouts tool. Click the Search All button and enter the number of vertical and horizontal images you would like to have on a page or page spread. Cascade will present all the layout templates available that match your search.
HOW TO GET RID OF TEMPLATE??
|
Layout Template:
Layout Template with Images:
|
Pano/Split Tool
The Pano/Split tool allows you to determine if you are placing an image or a layout template over a single page or an entire page spread.
- In Spreads tab, select a page or page spread.
- Select the left button of the Pano/Split tool to make the page spread a single panoramic spread.
- Select the right button of the Pano/Split tool to make the page spread two single pages.
Add/Remove Tool
The Add/Remove tool allows you to add and remove page spreads to and from your product.
To add a page spread:
- In the Spreads tab, select a page spread near where you would like a new page spread to be added.
- Select the button with the plus icon in the Add/Remove tool.
- A dialog will appear asking where you would like the new page spread. Select the desired location to create and place a new page spread.
To remove a page spread:
- In the Spreads tab, select the page spread you would like to remove.
- Select the button with the trash can icon in the Add/Remove tool.
- A dialog will appear asking if you are sure you want to remove the page spread. Select the desired action to remove the page spread.
Returning to an Earlier Step
Once you are at the Designer screen, you can return to the Home screen or the Configuration Options panel at any time. When you navigate away from the Designer screen, all work is automatically saved.
Return to the Home Screen: The breadcrumb navigation on the top of the Designer screen lets you return to your project folder or home screen. Select the icon you want to revisit to return to that step.
Return to Configuration Options: From the Designer screen, you can return to the Configuration Options panel by selecting the Configure Options button on the bottom left-hand corner of the Designer screen.
Previewing Your Product
??? Button doesn't currently work. Can preview from home screen or designer screen.
|
 |


